My site has moved to a new place ... check it out!
www.kristyskorner.weebly.com
See y'all over there!
I like to make things I can't afford to buy!
Monday, September 12, 2011
Sunday, September 11, 2011
I'm Thankful Everyday
I can’t believe it has been 10 years since 9/11. I can remember it like it was yesterday. I was a sophomore in high school and we watched the plane hit the second tower in my first period Spanish class. I’ve never been to New York but somehow feel a deep connection to the city after the attacks. My heart still breaks and tears still run down my cheek when I see footage of the victims struggling for life or hearing phone calls from the victims to their loved ones saying their last goodbye. I can’t imagine how it felt to be there that day or how it felt to lose a loved one in the attacks, but I can continue to pray for the ones lost and thank God every day that I have my family and friends.
Come On In ... Sit Right Down!
I’m starting to think I’m our neighborhood’s local alley cat! I LOVE finding people’s “trash” and turning it into something beautiful! The hubs started calling me “Alley Cat” as a joke and it has now turned into my nickname around the house! As much as I hate cats, I’m okay with the name (Sorry all you cat lovers!).
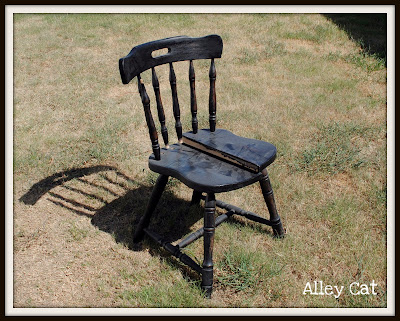
We found two beat up chairs the other weekend and knew we had to do something with them! The spindles were coming off, they were covered in cobwebs – they were just BEAT UP! So, being the “Alley Cat” that I am, I snatched those babies up, loaded them into my car, and took them to a loving home that they deserved!!!
Here’s what I had to work with …
They are beautiful chairs – they just needed some elbow grease and a fresh coat of paint.
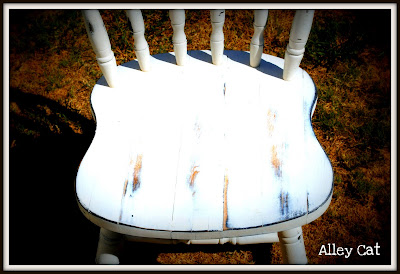
I attached the spindles back together and used wood glue to secure both the spindles and the seat together. I let that dry overnight – I wanted to make sure these suckers stayed intact. I woke up the next morning and put a couple of coats of Heirloom White on them and then let that dry. Once the paint was completely dry, I grabbed my sanding block and started the distressing process. I didn't realize how much the paint soaked into the chairs. It took A LOT of elbow grease for this but it was well worth it!
Here’s what I ended up with …
I’m really happy on how these turned out. They definitely look ten times better than what they did. They have come a long way from sitting in the alley to sitting in our kitchen now. We are going to use them as extra seating when people come over for dinner – That doesn’t mean I have to cook, does it? Lord help us!!
Friday, September 9, 2011
I Love Fall
Although the temperatures are still a little warm outside, I’ll take the 90’s over the 100’s any day! My favorite time of year is almost here and I’m slowly getting ready for fall. I love the dark, rich colors that fall brings (that’s probably why the hubs and I got married in October). So with fall right around the corner, I headed out to the garage to find all my fall decorations. I could have sworn I had more than 2 containers worth but that’s okay. Now, when I say I have 2 containers of fall décor, I mean I have 2 containers that aren’t even half full and 2 scarecrows. Seriously? That just means I’ll have to be creative this year!
So far starters, I laid out everything I had to get a preview of what I have to work with (which wasn’t much!). Here’s the list …
Cylinder glass containers (from our wedding)
Dollar store leaves/flowers
Raffia
Burlap
Plastic pumpkins
Grapevine wreath
What the heck am I going to do with these?!? I put on my thinking cap and went to work!
I took my cylinder glass containers, raffia, and dollar store leaves and put them on the table. Then I raided the pantry and found some pinto beans (Don’t ask me why we have those in there – the hubs HATES beans!)
And I made this …
I believe every door should have a wreath and I will argue that until the day I die! I took my grapevine wreath and burlap and dollar store flowers and did some magic. I cut my burlap into 1 ½ inch strips like this …
After I hung the wreath on the front door, I walked out into the street to take a look at it and just shrugged in awe … I love fall!!
Wednesday, September 7, 2011
Don't Judge Me!
Before I get into any of the projects I have been working on this week, I want to give a HUGE THANK YOU to my new neighbors that leave perfectly good furniture out for trash. Not only are these neighbors becoming good friends of mine (I haven’t met ONE neighbor yet!), they are filling my house with lovely free furniture. Thank you and keep them coming!!
If you missed out the other week, I talked about all the goodies the hubs and I found in our alley. So far we have given the desk we found a facelift. That can be found here …
http://ifonlyicouldmakethat.blogspot.com/2011/09/table-makeover.html
Now, what I haven’t told y’all yet is the hubs and I found some MORE stuff over Labor Day weekend. Yes, I know … we now have a horrible addiction to finding free furniture. Wait a second, it’s not all that horrible when it’s FREE! I love seeing people’s faces when they see something of ours and they ask “Where did y’all get that?” … “I love it!”. Well people … we got it in our alley and we just spruced it up some. Don’t judge us!!!
Are you curious what we found over the weekend?
Here’s the list …
2 TV trays
King size headboard
Another headboard and footboard
Planter
HUGE picture frame
I would say we hit jackpot again. I don’t understand why people throw perfectly good things away. They are just asking for the hubs and I to come by and sweep it up and give it new life.
Since I have tons of stuff to do this week, I wanted to focus on a project that would take no time at all. So, I headed towards the TV trays. The hubs and I probably wouldn’t use the TV trays for their original purpose but I thought how cute would those look for end tables or night stands?
Here’s what they looked like before. They were so roughed up, covered in cobwebs, just really dirty.
I’m really into heirloom white legs and stained wood on top of furniture right now and I could totally do that to these babies! After cleaning the suckers off, I started with the legs. I grabbed my favorite spray paint and painted the legs heirloom white.
Then I had the hubs sand the top of the trays while I had my hands full with munchkin. Once he finished with that, I headed straight for the dark walnut stain and got after it.
Once the stain was dry, I put a coat of Polycrylic Protective Finish on top of the trays to help protect it from every day use.
I let them dry overnight and woke up to some beautiful trays this morning. Here’s how my babies turned out … LURRVE THEM!!!!!
I absolutely love how these trays turned out! They look completely new and so different than they did. I love how they match our coffee table that the hubs built me. This was so meant to be!!! It took less than 30 minutes for this whole process (except letting the stain dry over night). I love these kinds of projects!
Tuesday, September 6, 2011
Desk Makeover
Labor Day weekend is over, the hub is back at work, munchkin is taking a nap, and I’m finally finishing up that pile of laundry that’s been staring at me for 3 days now! I probably should be folding and hanging clothes back up but instead I want to show y’all the desk makeover!
Remember this desk the hubs and I found in our alley?
Take a look at it now!
All this desk really needed was some TLC and I have plenty of that to give to FREE FURNITURE!
The top of the desk originally had laminate on it. It looked like an old kitchen countertop from the 70s. I needed to get rid of that fast! You could tell it belonged in a kid’s room because there were markers and crayons all over the side of the desk. You can’t see it in the “before” photo but believe me … they were there! Apparently the kid who had this in their room didn’t know how to color on paper so they just colored on the desk. Shame shame!
We only did a few things to this desk but it changed its appearance dramatically – I think for the better! We added a new top for the desk, some decorative trim, secured the legs on the sides (the legs weren't even on the table), took out an extra drawer to make a cubby and added new hardware. That sounds like a lot of things but seriously, it wasn’t! I wouldn’t have put that much energy into something that needed TONS of work.
Oh, and pretend like you don't see that wire on the floor next to the desk. Thanks! :)
As of right now it sits in our unfinished guest bedroom, or as I like to call it the "I don’t know where this belongs in the house so I’m going to put it in this room" and shut the door. Am I the only one that has that kind of room in their house?
Until next time y’all!
Thursday, September 1, 2011
What's For Dinner?
I went out to the garage earlier this morning to grab something to drink (we keep an extra fridge out in the garage – more of a “drink fridge”). While I was in there I saw this piece of scrap wood and thought something needed to be painted before noon today. I know I have a problem. I’m currently finding a 12-step program for spray paint addicts.
I knew exactly what I wanted to do with it. I’ve wanted to find some wood signs to hang throughout the house and I wanted to start in the kitchen. I swear it was meant to be because the wood was the PERFECT size to hang over our pantry door. All I had to do was “spray spray”, “stencil stencil”, “paint paint”, “sand sand” … in that order … and I was done. However, I was unaware of how time consuming this baby would be. May I remind you I have a munckin to take care of so this was pretty much an all-day affair. Nice. The laundry can wait another day.
Check out my new “Groceries” sign!
Subscribe to:
Posts (Atom)


